Configuration Example, Firewalling
Cisco IOS Authentication Proxy
Today I have been playing a little with my router at home. I was looking at different websites and stumbled on a Cisco website about Cisco IOS Firewall Authentication Proxy. So I thought by myself, lets give it a try.
Cisco IOS Authentication Proxy is a feature with the following discription:
“The Cisco IOS Firewall authentication proxy feature allows network administrators to apply specific security policies on a per-user basis. Previously, user identity and related authorized access was associated with a user’s IP address, or a single security policy had to be applied to an entire user group or subnet. Now, users can be identified and authorized on the basis of their per-user policy, and access privileges tailored on an individual basis are possible, as opposed to general policy applied across multiple users.
With the authentication proxy feature, users can log into the network or access the Internet via HTTP, and their specific access profiles are automatically retrieved and applied from a CiscoSecure ACS, or other RADIUS, or TACACS+ authentication server. The user profiles are active only when there is active traffic from the authenticated users.
The authentication proxy is compatible with other Cisco IOS security features such as Network Address Translation (NAT), Context-based Access Control (CBAC), IP Security (IPSec) encryption, and VPN client software.”
I already have my router configured with RADIUS for authenticating the CLI sessions. I configured the following commands to enable the Authentication Proxy Service:
aaa authentication login AD group radius local none
aaa authorization auth-proxy default group radius local
!
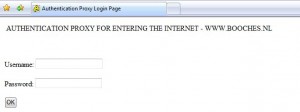
ip auth-proxy auth-proxy-banner http ^C AUTHENTICATION PROXY FOR ENTERING
THE INTERNET – WWW.BOOCHES.NL ^C
ip auth-proxy name PROXY http inactivity-time 60
ip admission auth-proxy-banner http ^C AUTHENTICATION PROXY FOR ENTERING
THE INTERNET – WWW.BOOCHES.NL ^C
!
interface BVI10
description Default LAN
ip address
ip access-group in
no ip redirects
no ip unreachables
no ip proxy-arp
ip nbar protocol-discovery
ip nat inside
ip auth-proxy PROXY
end!
ip http server
ip http authentication aaa
!
radius-server host auth-port 1812 acct-port 1813 key
radius-server retry method reorder
radius-server transaction max-tries 2
radius-server timeout 4
radius-server deadtime 2
radius-server vsa send authentication
After configuring the above configuration I opened Internet Explorer and received the following page:

After I insert the correct user credentials from the RADIUS server, which are my Active Directory credentials, I am granted access to the internet.
When I look at the Authentication Proxy feature, I would never implement it for one of my customers. Or maybe I would implement it for a INTERNET-ONLY VLAN segment or public work places. But I can image it would help in SOHO environments.
René Jorissen
Latest posts by René Jorissen (see all)
- MacOS Big Sur and SSLKEYFILELOG - November 23, 2021
- ClearPass, Azure AD, SSO and Object ID - August 12, 2021
- ClearPass – custom MPSK - July 20, 2021